Shopify merchants rely on Shopify POS for selling in-store, at pop-up locations, and on the go.
With more merchants moving towards an omnichannel commerce model, businesses who currently use apps for their online store will start looking for apps that serve their offline needs as well.
In order to help you extend your app’s capabilities into point of sale (POS)—or perhaps launch a whole new business based around point of sale apps— this article provides guidance on what types of apps merchants on Shopify POS are looking for, and how to extend your app into POS with Shopify App Bridge.
What kinds of apps are needed for in-store and omnichannel selling?
Physical spaces add a whole new layer of complexity to the commerce experience. With physical shelves to keep stocked, sales staff to manage, and clients looking for an elevated retail experience, apps that help complement and add order to these complexities are sure to be popular with retailers.
Below are seven specific categories to consider.
1. Inventory and order management
For merchants with multiple stores and/or warehouses, they need to know what stock they have, and where it’s located. This is not only important for keeping shelves stocked, but also for being able to direct customers to a different location where their desired item is in stock, or to order that item over to their preferred location. And, with Buy Online Pickup In Store (BOPIS) growing in popularity, merchants need an easy way to prepare for and manage in-store pick-ups.
2. Staff management
Gone are the days of the punch card. Today’s merchants need an easy way to track their staff’s clocks in and out for their shifts. Managing staff also requires staff scheduling, training, recording commissions, and more.
3. Upselling and cross-selling
Ever been up-sold at the cash register? If buyers fail to pick something up in the impulse-buy aisle, the sales representative who’s cashing them out can also make recommendations to help boost the cart size. Any app that alerts cashiers on product recommendations can be handy in helping sales staff sell more.
4. Clienteling and building relationships with customers
For most retail stores, establishing a base of loyal customers is crucial. This is why retailers need to go the extra mile to create enjoyment and an appealing shopping experience. To do this, in-store sellers are practicing clienteling: using tools to empower sales associates to create a personalized experience for each customer who walks through the door.
5. Loyalty and promotions
What’s sweeter than purchasing a shiny new pair of shoes? New shoes, and getting 10 dollars off your next purchase!
Inline with the importance of turning store visitors into loyal customers, loyalty programs and special promotions give buyers another reason to enter the shop.
6. Reporting and analytics
Which stores are getting the most foot traffic? What colors sell best in what regions? What times of day do you need the most staff?
With reporting and analytics apps, merchants can better track store data and make more informed decisions.
7. Accounting and taxes
More retail locations mean more line items in your users’ accounts. With more things to track—including physical assets that depreciate—having accounting and tax apps that capture that valuable information is mandatory.
You might also like: How to Get More App Downloads in the Shopify App Store.
Integrate into POS with Shopify App Bridge
If any of the above categories sound like needs your app fulfills or could be extended to fulfill, then there’s a great opportunity for your app to gain retail users.
The good news is that integrating into Shopify POS is pretty straightforward, and only requires one tool: Shopify App Bridge.
Using Shopify App Bridge, app developers can build useful tools that embed directly within the POS sales experience. In this post, we dive into the process, to help you get started building apps for POS.
1. Determine which part of the POS experience makes sense for your app
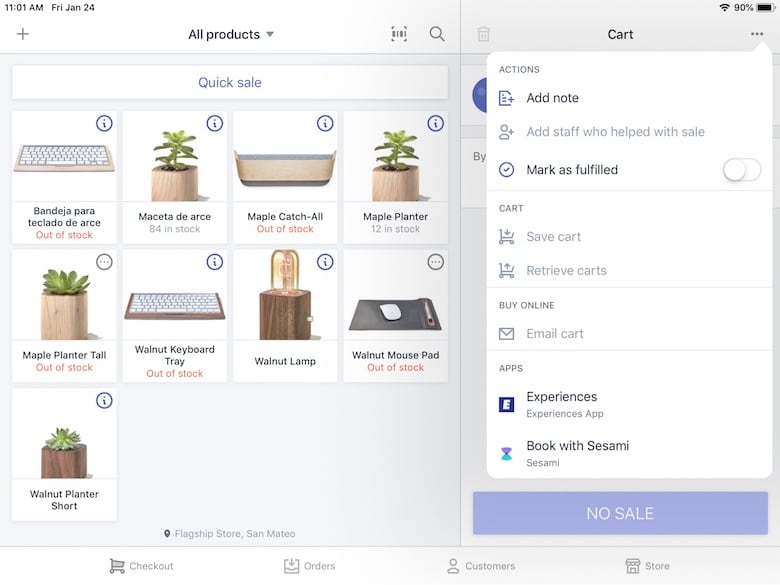
Merchants use point of sale apps for different parts of the sales experience: from always-on features such as the store’s music, to functions that relate to the cart and checkout. Overall, there are four different places where apps can be accessed. Below, we look at each.
Apps tab within the admin
For apps that aren’t needed during checkout—such as apps for employee clock-ins or sales staff training materials—the best place for your app to live is within the admin menu.

Add-to-cart integration
When it comes time for purchase, apps that use the add-to-cart integration can add shortcuts to help speed up and simplify the checkout. For example, if you find that there are certain products that always seem to be purchased together—like flip-flops, sunglasses, and beach towels—you can create a bundling app that adds all items to the cart in one click.

Another use-case could be to add charitable items that are not part of your user’s physical inventory, such as a donation amount.
In addition, if a merchant provides a service in conjunction with a product, those details can be recorded and input as an item in the cart. This can include services such as assembly, scheduling installations, or details for engravings or monograms.
By collecting and compiling this information into a transaction, you can help merchants stay organized by gathering purchase details in one place, while simultaneously allowing them to accept credit card payment for said services.
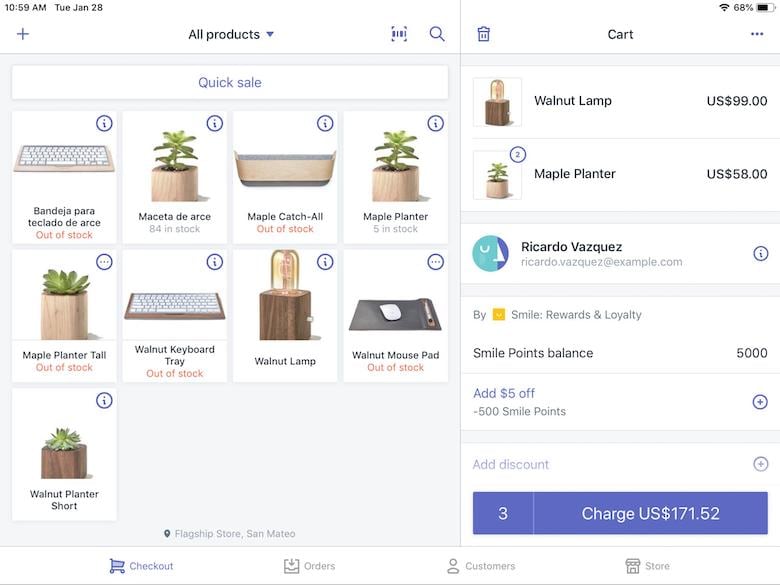
Edit cart integration
Once all items have been added to the cart, you can integrate apps here that help provide additional add-ons prior to tallying the amount owing, and accepting payment.
This integration point is ideal for apps that record customer data or enable discounts, and allows for brick-and-mortar merchants to offer loyalty programs as well as special discounts and wholesale pricing.

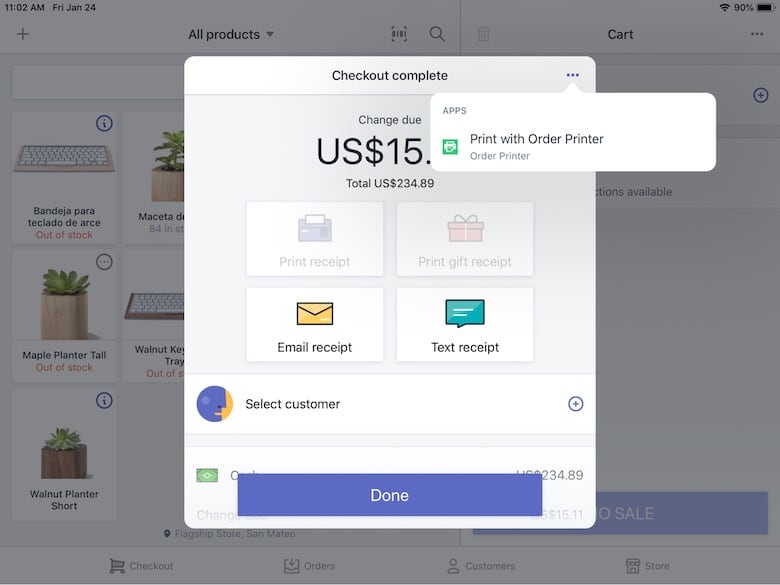
Completed order integration
You can use the completed order integration for apps that run at the end of a transaction. Two common use cases would be post-purchase surveys and custom receipt printing apps. If there’s any other special touch required at the end of a transaction, such as item care instructions, this is the ideal place in the checkout flow.

You might also like: Using Shopify App Bridge to Build Faster, More Functional Apps.
2. Initialize Shopify App Bridge
After the JWT flow, your app should initialize Shopify App Bridge. You can do this in one of two ways: by using npm or yarn to use with bundlers or webpack, or by directly including a CDN-hosted copy of the library.
To use a build system :
npm install--save @shopify/app-bridge
Or
yarn add @shopify/app-bridge
To use the CDN-hosted alias:
<script src="https://unpkg.com/@shopify/app-bridge"></script>
<script>
     var AppBridge =window['app-bridge'];
     var actions =window['app-bridge'].actions;
</script>
Once this code is set up, use your app’s API key and shopOrigin (https://CURRENT_LOGGED_IN_SHOP.myshopify.com) so it connects with the store that’s just gone through JWT.
Using modular JavaScript :
import createApp from '@shopify/app-bridge';
const app = createApp({
     apiKey: 'API key from Shopify Partner Dashboard',
     shopOrigin: shopOrigin,
});
Using ES5 and the CDN-hosted version:
var AppBridge =window['app-bridge'];
var createApp = AppBridge.default;
var app = createApp({
     apiKey: 'API key from Shopify Partner Dashboard',
     shopOrigin: shopOrigin,
});
3. Program app functions
Now that you’re able to connect with the user’s POS device, you’ll need to program the functions you want your app to provide.
Fetching data and managing line items
To fetch information about items in the cart, you can use the code below:
var unsubscriber = cart.subscribe(Cart.Action.UPDATE, function (payload: Cart.Payload) {
   console.log('[Client] fetchCart', payload);
   unsubscriber();
});
cart.dispatch(Cart.Action.FETCH);
What this will do is communicate information about the cart—such as products added, customer information, and total purchase amount—back to your app. Once you’ve fetched this information, you can manage the line items to perform your desired app function.
| var lineItemPayload = { | |
| variantId: '1234', | |
| quantity: 1 | |
| }; | |
| var unsubscriber = cart.subscribe(Cart.Action.UPDATE, function (payload: Cart.Payload) { | |
| console.log('[Client] addLineItem', payload); | |
| unsubscriber(); | |
| }); | |
| cart.dispatch(Cart.Action.ADD_LINE_ITEM, { | |
| data: lineItemPayload | |
| }); |
Add additional items (like bundles) to the cart
If instead you wanted to add a quick sale item to the cart, your code would be almost the same. The only difference is that your payload would be:
var lineItemPayload = {
     price: '20',
     quantity: 1,
     title: 'Bab Low - Blue Jay // White Soles',
};
Adding cart attributes
You can attach arbitrary data to the cart using cart attributes. After the order is completed, cart attributes are available to the merchant from the Shopify Admin, the API, and from Liquid, our theme templating language.
You can also attach properties to line items. This is useful for purchases that require custom touches, such as engravings and monograms. You can create an app that gathers and saves information on what is to be engraved on the purchased item. This info can be used in the fulfillment flow.
| var unsubscriber = cart.subscribe(Cart.Action.UPDATE, function (payload: Cart.Payload) { | |
| console.log('[Client] setLineItemProperties', payload); | |
| unsubscriber(); | |
| }); | |
| cart.dispatch(Cart.Action.SET_LINE_ITEM_PROPERTIES, { | |
| index: 0, | |
| data: { | |
| referral: 'Shopify', | |
| userID: '1234', | |
| } | |
| }); |
Setting discounts
You can assign discounts to the cart based on the customer or on the POS location. Discounts can be based on a percentage or a flat amount. A flat discount can be done with the code below.
| var discountPayload = { | |
| amount: '1', | |
| discountDescription: "$1 off discount", | |
| type: 'flat', | |
| } | |
| var unsubscriber = cart.subscribe(Cart.Action.UPDATE, function (payload: Cart.Payload) { | |
| console.log('[Client] setDiscount', payload); | |
| unsubscriber(); | |
| }); | |
| cart.dispatch(Cart.Action.SET_DISCOUNT, { | |
| data: discountPayload | |
| }); | |
| ``` | |
| `app.getState('pos.user').then((user) => { | |
| }); |
There may be instances where a physical shop may have many staff members using the POS system. This function can help you retrieve the current user who’s logged in. You can also have the user identify themselves, and expose different features for different users.
app.getState('pos.location').then((location) => {
});
Merchants may have multiple locations in which they operate. This function can be used to determine the location your POS system is being used at for a particular sale. This can also be used to add location-specific features, such as location-specific sales.
Toast notices
These can be used to display a pop-up to let the merchants know if an app function worked, or if it failed.
| const toastNoticeOptions = { | |
| message: 'Product saved', | |
| duration: 5000, | |
| }; | |
| const toastNotice = Toast.create(app, toastNoticeOptions); | |
| const toastErrorOptions = { | |
| message: 'Error saving', | |
| duration: 5000, | |
| isError: true, | |
| }; | |
| const toastError = Toast.create(app, toastErrorOptions); |
You might also like: How to Improve Your App’s Design and Gain More Users.
Ready to start building a POS app?
POS and omnichannel selling are growing, exciting spaces. With buyers wanting seamless and captivating retail experiences—and merchants trying to find ways to meet this demand—the opportunity for apps to facilitate these experiences directly from the POS terminal is vast.
Another bonus is that this is still a pretty green space on the Shopify App Store. Whether you’re looking to grow your app business or launch a new one, apps for the POS category are a must-consider.
If you’re interested in learning more about building apps for in-person sales, check out our documentation on Shopify App Bridge.
Read more
- Announcing Shopify’s New Sketch Plugin: Polaris Telescope
- How to Build a Shopify App: The Complete Guide
- The Essential List of Resources for Shopify Theme Development
- How to Authenticate Your Embedded App in the Shopify Admin
- How to build a Shopify POS Pro demo store
- Order Editing: What This Means for Shopify App Developers
- How to Level Up Your App with Theme App Extensions
- How to Build an Effective and Friendly App Support Process
- How to be Successful on the New Shopify App Store
Already have an idea for a point of sale app? Tell us about it in the comments below.

